Instagram

Follow this blog with bloglovin

Follow on Bloglovin

Thursday, November 14, 2013

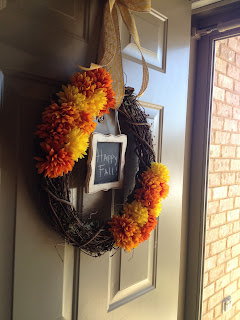
Chalkboard wreath


This wreath is one of my favorites that I've made!! It was super easy to make and is definitely a wreath I'll make for other seasons just so I can write on the chalkboard. I actually made this wreath as a gift because I already have an awesome fall wreath (seen here),  but it was really hard to not keep this one for myself! 


Here's a rundown (and picture) of what you'll need 


1. Grapevine wreath ($4 at walmart)
2. Acrylic paint (brown and white)
3. Ribbon
4. Flowers 
5. Yarn
6. Hot glue gun
7. Frame
8. Chalkboard paint  


The first thing I did was to take my frame apart and spray the backing with chalkboard paint. I used this brand because I could get it online for a fraction of what I would have paid buying it in any store. While that was drying I painted and antiqued my frame.


Then once the chalkboard paint was dry I added that part back to the frame 

The next step was to remove the flowers from their stems (which was super easy). I then arranged the flowers on the wreath before gluing them to make sure I liked the layout. Once you get the flowers where you want them just use hot glue to attach them to your wreath.


The last thing you need to do is attach the bow and the chalkboard. I used the same faux bow technique I have in my other wreath posts to attach my ribbon to the wreath. I also stapled a piece of yarn to the back of the frame and hung that from the end of the ribbon on the wreath. 


You can attach the ribbon and frame any way you would like, but this is the way that worked for me! 


Follow my blog with Bloglovin

Tuesday, October 15, 2013

"Give Thanks" Door hanger


I posted a picture of this door hanger I made a few weeks ago on facebook, but I figured I'd also post a little tutorial on how to make it.

It's pretty simple, and uses a lot of the same techniques I use when I make my stenciled frames!


Of course I didn't take step by step pictures because at the time I wasn't sure I would post a tutorial. So I'm going to try and do it without pictures :/

Okay so you'll need

1. A piece of plywood (or any other board/canvas)
2. Pumpkin cutout
3. Ribbon (two kinds)
4. Acrylic paint
5. Stencil
6. Paint pen
7. Foam brushes
8. Craft glue

The two things on that list that are a little strange and you may not already have at home are the wood and pumpkin cutout but.....they are easily found at your local craft store!

Below is a link to the size plywood craft board I used..and also the pumpkin cutout.
Via
Via  (or local craft store)
The pumpkin is made from craft foam and was actually a little wide for my board so I just drew some lines going along with the curve of the pumpkin and trimmed the edges following those lines. I also had my awesome husband drill some holes into the plywood before I began painting so I could string some ribbon through at the end.

First, I painted the whole board my base color which was an antique white. Then using my stencil found here...
Via

I stenciled my board with a color called "Mississippi Mud" which I now love! 

Next it was time to paint my pumpkin. Now, the pumpkin was already orange when I got it but it was a very bright highlighter orange, so I went over it with another orange paint to tone it down a little. I also painted the edges brown to cover up the exposed white foam from my trimming. I then painted the stem a combination of green and brown, and the final step was to use brown and white paint to give it some dimension. 


I then made a faux bow using this tutorial and glued it onto the pumpkin. Next, I used some painters tape and taped the pumpkin on temporarily so I could see where I wanted my text to be. Then using a gold paint pen I added on my text. After that all I needed to do was glue on my pumpkin and string some burlap through the top so I could hang it. 

I'll probably be making one of these for every season and then one we can hang when there isn't a holiday because I love the color it adds to the pantry door :) 


Sunday, October 6, 2013

Chalkboard mug...take one


Ok so my first experience using chalkboard paint was a bit of a disaster, but if you don't look super close and kinda close one eye it looks great!!!


Basically I used a lot of goo gone to remove paint from where it wasn't supposed to be and ended up with a lot of jagged edges. On the bright side though the mug was $1.50 and who doesn't love a mug?! right....

I'm not even going to explain my steps bc I went about this the most ridiculous way ever...so instead you get pictures :)


Tuesday, October 1, 2013

Fall wreath makeover!


Last weekend after going fall crazy at hobby lobby, and coming home with an awesome fall haul...

I knew it was time to get cracking on my fall wreath makeover.

Now the wreath we already have we got at target two years ago, and it was fine for the price and what I wanted at the time, but after seeing all the amazing wreaths on pinterest I knew that I could makeover the wreath we had and spend way less than buying or making a whole new one.

so here it is before...


Not too bad right? Well when I pulled it out of the attic it was definitely smaller than I had remembered, but I thought I'd still be able to spruce it up. 

I figured I had to keep it fairly simple since the wreath wasn't that big and it had a lot going on already. So I picked up a craft letter 'S' and some ribbon (that i'm in love with) from HL.


I painted the 'S' using some off-white spray paint we already had. I also distressed it a little. I then stapled two staples in the back of it and then pulled them out a little so there was almost like to little hooks. I then took some string and by threading it through the staples I was able to secure it to the wreath. The string I used was almost exactly the same color as the spray paint so that was nice! 

However, you don't have to use string. If my wreath hadn't been so bulky and had more of a flat surface to it I would have glued the 'S' on. 

Then using an awesome faux bow tutorial found on pinterest 
Via
I created a bow out of my favorite rbbon.

I then attached the bow with glue onto a piece of ribbon I had already tied around the wreath
...and ta da !!!


I'm totally loving the makeover! 


Sunday, September 29, 2013

Happy Fall Y'all


Enjoying a lovely fall weekend complete with funnel cake from the seafood festival and a yummy Pumpkin spice latte :))))

Have a great week!!!!

Monday, September 23, 2013

Frames, frames and more frames!


Ok so I'm obsessed with decorating my own frames! I recently realized that I could totally make those awesome frames you see everywhere for a fraction of the cost!


These are the frames I've done so far. The two sets were wedding gifts and the red one is a makeover I did on a frame we already had! 

I'm going to try and give step by step instructions and hopefully the whole process will make sense!

I started with these supplies...
You'll need...
1. Acrylic paint
2. Flat sponge brush

3. Round dot sponge brush
4. stencil 
5. Frame
6. Sand paper
7. Spray Laquer (optional)
8. Ribbon (optional) 
9. Craft glue (optional) 


Ok...I know it sounds like a lot, but most of these things you only have to buy once and then you're set. 
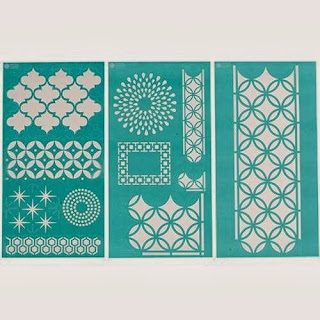
I found the frame at a local craft store and that's also where I got my stencil. The stencil is a Martha Stewart pack that can be found in most craft stores or here.

The first step is to paint your frame(s) using your background color. This will be the color you see the least of if you use this stencil.

You'll need to do about two coats of your base color


Then once that dries you can start stenciling with your other color.


You do this using your round dot sponge brush. It takes some practice the first time just because getting the stencil in the right place can be a little tricky, but once you know what you're doing it goes by pretty quickly. Also, after I'm done stenciling I take my stencil color and go around the edges of the frame to make it match the front.

Here they are before distressing...

these turned out more St. Patricks day than I realized they would :( 

To distress your frames you can use sandpaper and also a little brown paint. Just put brown paint on your flat sponge and wipe it almost dry. Then just brush it across the frame and around the edges as much as you want...and ta da!

Now they look better! 

For these frames rather than doing a stacked frame effect I opted to add a ribbon. Sooooo I made up a little faux bow and then used some craft glue to attach it to the top of the frame.

it helps to use clamps to hold the bows in place while they dry

Finally about one to two hours later you've got two awesome DIY frames!


Here's the other set of frames as did as a wedding gift!

these were actually four frames that I stacked together...and I used spray paint for the background color on these. I got these frames from a local craft store and they were made to be stacked.

The other frame I stenciled was one we made a while ago and I thought it was just a little plain.


 I just stenciled the edges, changed the picture...and distressed it of course!


I'm in love with making my own frames now and it's so much less expensive to do it yourself! I plan on making a bunch of these for christmas presents and also to decorate our house as the seasons change!

Wednesday, September 18, 2013

Fall flowers


my lovely husband brought these home last night just in time to start decorating for fall this weekend :)